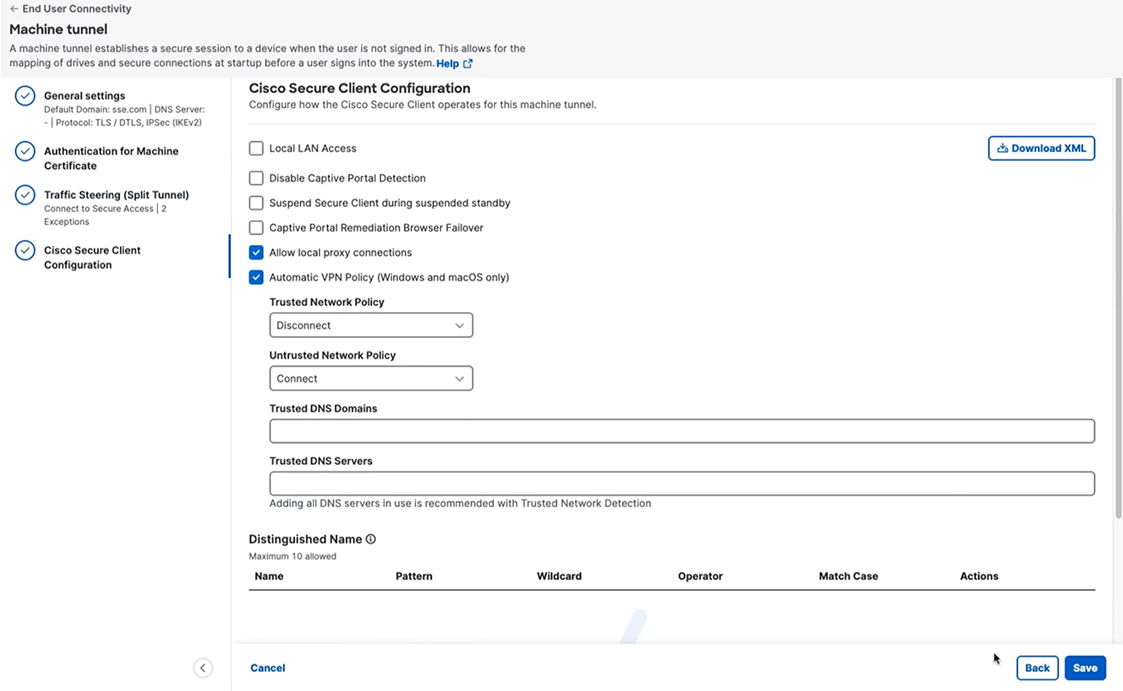
Step 4 – Cisco Secure Client Configuration
You can modify a subset of Cisco Secure Client settings based on the needs of a particular VPN machine tunnel.
-
Review the options presented on the Cisco Secure Client Configuration tab.
-
Configure the options that are specific to your machine tunnel:
-
Local LAN Access—Allows the user complete access to the local LAN connected to the remote computer during the VPN session to Secure Access.

Enabling local LAN access can potentially create a security weakness from the public network through the user computer into the corporate network. - Disable Captive Portal Detection—When Cisco Secure Client receives a certificate with a common name that does not match the Secure Access name, a captive portal is detected. This behavior prompts the user to authenticate. Some users using self signed certificates may want to enable connection to corporate resources behind an HTTP captive portal and should thus mark the Disable Captive Portal Detection checkbox. The administrator can also determine if they want the option to be user configurable and mark the checkbox accordingly. If user configurable is selected, the checkbox appears on the Preferences tab of the Cisco Secure Client UI.
- Suspend Secure Client during suspended standby— (Windows Only) Available only for devices that support Connected Standby. During Connected Standby, the operating system throttles system process, which can impact how packets are processed. With this option, you can disable VPN traffic when the system enters Connected Standby mode. The feature is disabled by default.
- Captive Portal Remediation Browser Failover—Allows the end user to use an external browser (after closing the Cisco Secure Client browser) for captive portal remediation.
- Allow Local Proxy Connections—By default, Cisco Secure Client lets Windows users establish a VPN session through a transparent or non-transparent proxy service on the local PC. Uncheck this parameter if you want to disable support for local proxy connections. Some examples of elements that provide a transparent proxy service include acceleration software provided by some wireless data cards, and network components on some antivirus software.
-
Automatic VPN Policy (Windows and macOS only)—Enables Trusted Network Detection allowing Cisco Secure Client to automatically manage when to start or stop a VPN connection according to the Trusted Network Policy and Untrusted Network Policy. If disabled, VPN connections can only be started and stopped manually. Setting an Automatic VPN Policy does not prevent users from manually controlling a VPN connection.
-
Trusted Network Policy—Action Cisco Secure Client automatically takes on the VPN connection when the user is inside the corporate network (the trusted network).
- Disconnect (Default)—Disconnects the VPN connection upon the detection of the trusted network.
- Connect—Initiates a VPN connection upon the detection of the trusted network.
- Do Nothing—Takes no action in the untrusted network. Setting both the Trusted Network Policy and Untrusted Network Policy to Do Nothing disables Trusted Network Detection.
- Pause—Cisco Secure Client suspends the VPN session instead of disconnecting it if a user enters a network configured as trusted after establishing a VPN session outside the trusted network. When the user goes outside the trusted network again, Cisco Secure Client resumes the session. This feature is for the user's convenience because it eliminates the need to establish a new VPN session after leaving a trusted network.
-
Untrusted Network Policy—Cisco Secure Client starts the VPN connection when the user is outside the corporate network (the untrusted network). This feature encourages greater security awareness by initiating a VPN connection when the user is outside the trusted network.
- Connect (Default)—Initiates the VPN connection upon the detection of an untrusted network.
- Do Nothing—Takes no action in the trusted network. This option disables Always-On VPN. Setting both the Trusted Network Policy and Untrusted Network Policy to Do Nothing disables Trusted Network Detection.
-
Trusted DNS Domains—DNS suffixes (a string separated by commas) that a network interface may have when the client is in the trusted network. For example: ''.cisco.com.
Wildcards ('*') are not supported for DNS suffixes. - Trusted DNS Servers—DNS server addresses (IP addresses separated by commas) that a network interface may have when the client is in the trusted network. For example: 192.168.1.2, 2001:DB8::1. Note: Wildcards ('*') are not supported for DNS server addresses.
-
Trusted Network Policy—Action Cisco Secure Client automatically takes on the VPN connection when the user is inside the corporate network (the trusted network).
-
Local LAN Access—Allows the user complete access to the local LAN connected to the remote computer during the VPN session to Secure Access.
-
Distinguished Name—Specifies distinguished names (DNs) for exact match criteria in choosing acceptable client certificates. When you add multiple Distinguished Names, each certificate is checked against all entries, and all of them must match.
A maximum of 10 distinguished names are allowed.-
Name—The distinguished name (DN) to use for matching:
- CN—Subject Common Name
- C—Subject Country
- DC—Domain Component
- DNQ—Subject Dn Qualifier
- EA—Subject Email Address
- GENQ—Subject Gen Qualifier
- GN—Subject Given Name
- I—Subject Initials
- L—Subject City
- N—Subject Unstruct Name
- O—Subject Company
- OU—Subject Department
- SN—Subject Sur Name
- SP—Subject State
- ST—Subject State
- T—Subject Title
- ISSUER-CN—Issuer Common Name
- ISSUER-DC—Issuer Component
- ISSUER-SN—Issuer Sur Name
- ISSUER-GN—Issuer Given Name
- ISSUER-N—Issuer Unstruct Name
- ISSUER-I—Issuer Initials
- ISSUER-GENQ—Issuer Gen Qualifier
- ISSUER-DNQ—Issuer Dn Qualifier
- ISSUER-C—Issuer Country
- ISSUER-L—Issuer City
- ISSUER-SP—Issuer State
- ISSUER-ST—Issuer State
- ISSUER-O—Issuer Company
- ISSUER-OU—Issuer Department
- ISSUER-T—Issuer Title
- ISSUER-EA—Issuer Email Address
-
Name—The distinguished name (DN) to use for matching:
-
Click Save to complete the VPN machine tunnel.
