Create an AWS Stack
Secure Access requires an AWS stack to monitor and communicate with your S3 resources. If you have more than one AWS tenant, you will need a stack for each tenant. If you enable both DLP and Cloud Malware protection for a tenant, a single stack can serve for both purposes.
|
|
If you enable both DLP and Cloud Malware protection for an AWS tenant, and then disable one of those two forms of protection, you must leave the stack intact to support the remaining protection.
|
|
|
Perform this task after you have downloaded a CloudFormation Template in Step 4 of Authorize an AWS Tenant. Once you have created the stack, return to Step 5 of that task.
|
For more information about AWS Stacks, see the Amazon AWS Cloud Formation User Guide.
- Log in to the AWS Management Console with an Admin account.
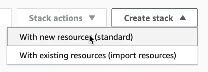
- In the AWS console, navigate to CloudFormation > Stacks and choose Create new stack > With new resources.
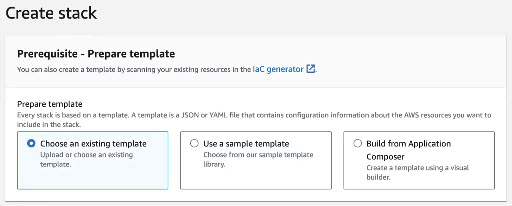
- On the Create stack page, under Prerequisite - Prepare template, select Choose an existing template.
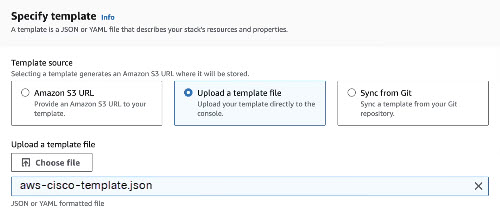
- On the Create stack page, under Specify template, select Upload a template file, then click Choose file and navigate to and select the JSON file (aws-cisco-template.json) on your local system which you downloaded when you authorized the AWS tenant in Secure Access.
- (Optional) Click View in Application Composer to open a new tab displaying a graphical representation of the stack deployment.
- Click Next.
- For the remaining options in the stack creation wizard, choose the settings appropriate to your environment. We recommend the following best practices:
-
Provide a stack name that is meaningful within your environment.
-
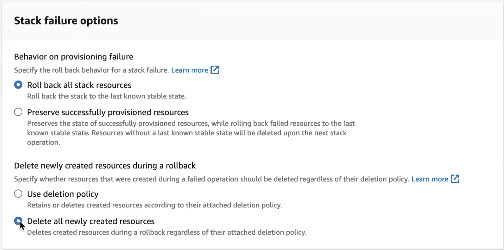
Under Stack failure options, choose Role back stack resources and Delete all newly created resources.
-
- Acknowledge that AWS CloudFormation may create IAM resources with custom names within your AWS account.

- Click Submit.
- In the AWS console the status of all stack in your account is displayed under CloudFormation > Stacks. Wait until the status for your new stack is displayed as CREATE_COMPLETE.
- Continue with Step 5 of Authorize an AWS Tenant.


