Configure Okta with the Secure Access SAML Metadata
|
|
Your instance of the Okta SAML IdP must send the Cisco Secure Access User principal name in the NameID attribute in the SAML assertion. |
Add the Secure Access service provider metadata to your instance of Okta. You must configure Secure Access as a generic SAML 2.0 application within Okta. Okta does not provide a method to upload Secure Access metadata for automatic configuration. Extract the EntityID and AssertionConsumerService values from the Secure Access metadata file and add these values in Okta.
|
|
If you have general questions about the Okta SAML IdP, we recommend that you contact Okta. |
- Sign in to your instance of Okta, then navigate to Applications > Create a
new app integration.

-
Click SAML 2.0, and then click Next.
-
For General Settings, add a name for the app integration, and then click Next.
-
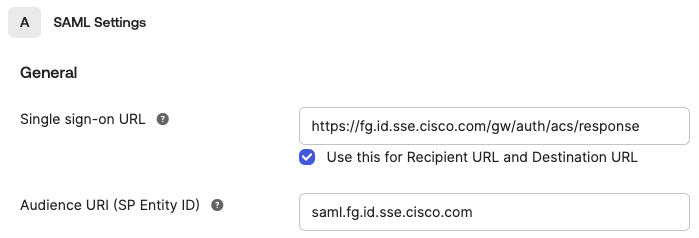
For SAML Settings > General, enter the Secure Access service provider metadata URL and the certificates from the file that you downloaded in Step 3 – Download the Secure Access SP Metadata and Certificates .
-
For Single sign-on URL, add
https://fg.id.sse.cisco.com/gw/auth/acs/response. -
For Audience URI (SP Entity ID), add
saml.fg.id.sse.cisco.com, or the organization-specific entity ID. -
For Name ID format, choose EmailAddress.
-
-
(Optional) Click Show Advanced Settings.
-
(Optional) For Signature Certificate, upload the root certificate that you downloaded from the Cisco_SSE_SP_Metadata XML file. Click Preview the SAML Assertion to show the created metadata file, and then click Next.
-
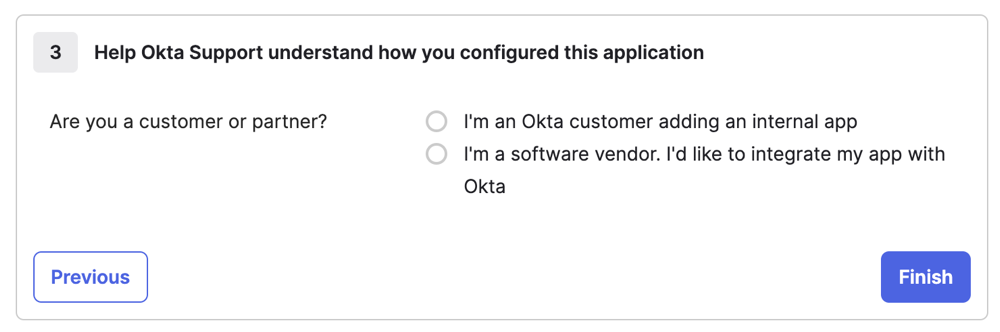
Click I'm an Okta customer adding an internal app.
- Click Finish.


