Software Secure Workload
Activity Configure

ISE Instance Configuration

ISE instance config
Figure 1: ISE instance config


Starting Cisco Secure Workload version 3.7, the SSL certificate for Cisco ISE pxGrid node requires Subject Alternative Names (SAN) for this integration. Ensure the certification configuration of the ISE nodes is done by your ISE administrator prior to performing the integration with Secure Workload.

To verify your pxGrid node’s certificate and confirm if SAN is configured, you need to do the following to verify the certificate from ISE.

Procedure

1

Go to Certificates under Administration > System.

2

Under Certificate Management, select System Certificates, select your “Used by” pxGrid certificate and choose View to review the pxGrid node cert.

3

Scroll the certificate and ensure the Subject Alternative Names are configured for this certificate.

4

This certificate should be signed by a valid Certificate Authority (CA), which should also be used to sign the pxGrid client certificate used for the Secure Workload ISE connector.

Figure 2: Example of a Valid ISE pxGrid Node Certificate
5

You can now generate the pxGrid client certificate signing request using the following template on any host installed with OpenSSL.


   [req]
   distinguished_name = req_distinguished_name
   req_extensions = v3_req
   x509_extensions = v3_req
   prompt = no
   [req_distinguished_name]
   C = YOUR_COUNTRY
   ST = YOUR_STATE
   L = YOUR_CITY
   O = YOUR_ORGANIZATION
   OU = YOUR_ORGANIZATION_UNIT
   CN = ise-connector.example.com
   [v3_req]
   subjectKeyIdentifier = hash
   basicConstraints = critical,CA:false
   subjectAltName = @alt_names
   keyUsage = critical,digitalSignature,keyEncipherment
   extendedKeyUsage = serverAuth,clientAuth
   [alt_names]
   IP.1 = 10.x.x.x
   DNS.1 = ise-connector.example.com

Save the file as ‘example-connector.cfg’ and use the OpenSSL command from your host to generate a Certificate Signing Request (CSR) and the certificate private key with the following command.

openssl req -newkey rsa:2048 -keyout example-connector.key -nodes -out example-connector.csr -config example-connector.cfg
6

Sign the Certificate Signing Request (CSR) by your CA using a Windows CA server. If you are also using a Windows CA server, run the following command to sign the pxGrid client’s CSR.

certreq -submit -binary -attrib "CertificateTemplate:CiscoIdentityServicesEngine" example-connector.csr example-connector.cer


Windows CA requires a Certificate Template. This template should contain the following extensions.

Figure 3: Extensions of Application Policies for a Certificate Template
7

Copy the signed client certificate and the root CA in PEM format onto your host. This is the same host that generates the client CSR and the private key. Use OpenSSL to ensure the client certificate is in X.509 PEM format. Run the following command using OpenSSL to convert the signed client certificate to the X.509 PEM format.

openssl x509 -inform der -in example-connector.cer -out example-connector.pem
8

You can also confirm the PEM that is signed by the CA, use the following command.
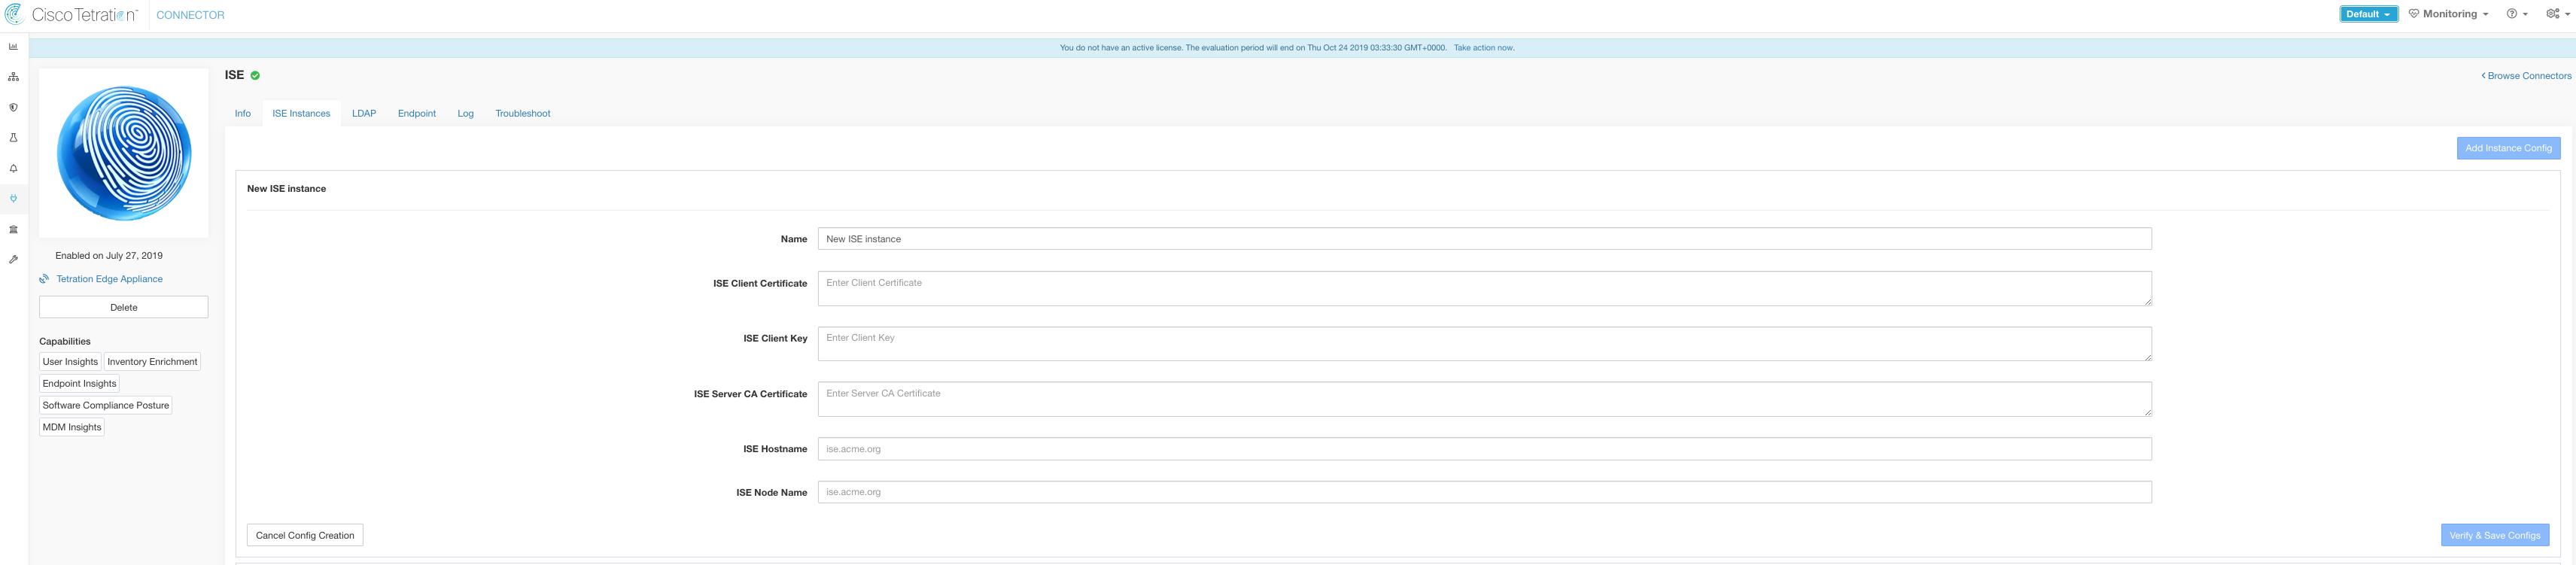
openssl verify -CAfile root-ca.example.com.pem example-connector.pem
example-connector.pem: OK


For multi-node ISE deployment with pxGrid, all the pxGrid nodes must trust the Certs used for the Secure Workload ISE Connector.

9

Using the above example’s file names, copy the ISE client cert - example-connector.pem, client key - example-connector.key and CA – root-ca.example.com.pem into the respective fields on the ISE configuration page on Secure Workload as shown below.


Before upgrading to the latest version of Secure Workload, ensure that you delete the ISE connector to remove any existing configuration data. After the upgrade is complete, configure the ISE connector with the new filters you want to apply.

Figure 4: ISE Connector Configuration
Figure 5: ISE Connector Configuration
Table 1. ISE Connector Configuration

Field

Description

Name

Enter an ISE instance name.

ISE Client Certificate

Copy and paste ISE client certificate.

ISE Client Key

Copy and paste the ISE client key. The client key must be a clear key, which is not password protected.

ISE Server CA Certificate

Copy and paste Root CA certificate.

ISE Hostname

Enter ISE hostname (FQDN).

ISE Node Name

Enter ISE node name.

Ignore ISE Attributes (Optional)

Select one or more ISE attributes from the list.

Use this option if you do not want to ingest all contextual information of endpoints reported through ISE.

ISE IPv4 Subnet Filter (CIDR Format) (Optional)

Enter multiple IPv4 subnets to filter ISE endpoints.

ISE IPv6 Subnet Filter (CIDR Format) (Optional)

Enter multiple IPv6 subnets to filter ISE endpoints.


  • If an IP Address is used instead of FQDN for the ISE Hostname, then use the IP address in the ISE CA certificate SAN, else, there may be connection failures.

  • Number of active endpoints on ISE is not a snapshot, it depends on the configurations on ISE and the aggregation duration for computing the metric. The agent count on Secure Workload is always a snapshot based on last pull from ISE and pxgrid updates, typically the active device count over last one day ( default refresh frequency for full snapshots is a day). Due to the difference in the way these numbers are depicted, it is possible that these two numbers will not always match.